Building A Winter Brush Shelter
How to build a (hopefully) waterproof, warm shelter from natural materials in the forest. This project was filmed over about 6 weeks. Don't worry, it shouldn't take you that long to build one, but I do have a day job! Anyways, I'm really pleased with the result and hope you are too.
Building the Initial Structure
A good winter shelter will start with a strong, sturdy foundation. For this one, I used long wooden poles to build a 4 sided pyramid that will serve as the initial structure for our shelter.
Leaf Mold Roof
What's the point of a shelter? To keep us dry and warm! Using A LOT of leaves to form a leaf mold roof will provide the proper insulation and waterproofing for our shelter.
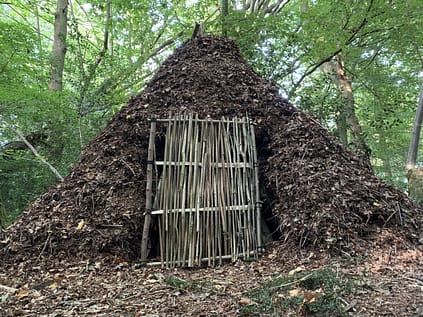
Hazel Branch Door & Finished Shelter
Our shelter wouldn't be a proper abode without a door! It's important not to skip the previous platform step, or else the integrity of the roof just above the door will be compromised.
Want the best kit for future adventures?
Click below to explore the Outdoor Skills shop for some of the best kit in bushcraft

Sounds like fun. I’ve made similar shelter when me and my 4 year old got lost in the woods.
It was in the fall and we were visiting friends. We like walking in the woods and I was teaching a few things to my daughter.
I noticed it was getting late so we started back. That’s when I noticed I had walked in a circle.
It was getting dark. So I pushed a fallen tree up in a fork of a tree. Then started placing sticks on and placing them close together to form a hull.
I then started placing sticks horizontally across the others. There was mostly pine needles and few leaves. So we started throwing those on the framework until I couldn’t see any light.
After resting a bit I noticed it was getting colder and we had no sweaters nor coats. Then I decided to put pinestraw inside and more on top. It was about 6 inches deep. We crawled in then covered the entrance with more pine straw.
We went to sleep fast. We slept close together and was very warm.
It was so dark inside that I didn’t know if it was night or day. So I waited to hear the birds.
It was mid morning when we woke. And crawled out of our structure. There was snow all around. We were very warm inside. It was very cold outside.
What a great lesson we learned together. I had never seen that type of shelter before. It just came to my mind and I did it.
Wow, that is some adventure!
Is there a video with this article?
Yep – have a look at the top of the page!
Thanks